
 🚩五分钟上手
如果你还是一名新手,本文将带着你用五分钟时间完成一套完整的通信服务。 当然,想要达到精通的程度,还需在工作中多多实践。
# 第1分钟:创建工程
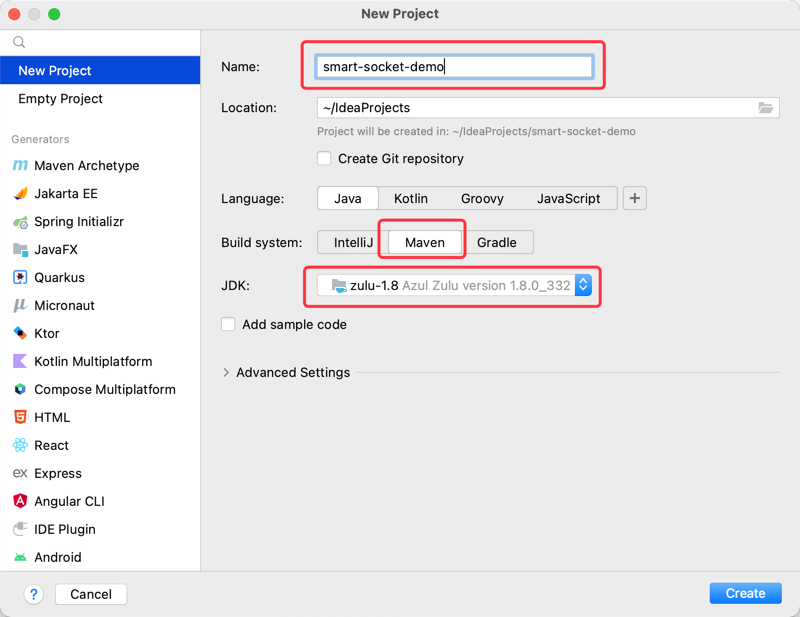
我们推荐采用 IDEA 创建一个示例项目。你可以为该项目取一个自己喜欢的名字,但构建方式最好是 Maven(因为我不擅长Gradle,遇到问题可能无法为你提供帮助)。
如果你的 JDK 版本是 8~10,可选择 smart-socket 1.5.x 的版本;如果 JDK 版本是 11~21,需选择 1.6.x 的版本。
# 第2分钟:引入 Maven 依赖
打开 pom.xml 文件,复制粘贴以下内容。
<dependencies>
    <dependency>
        <groupId>io.github.smartboot.socket</groupId>
        <artifactId>aio-core</artifactId>
        <version>1.5.52</version>
    </dependency>
</dependencies>
1
2
3
4
5
6
7
2
3
4
5
6
7
如果网络不好加载依赖较慢,可以试着将 maven 仓库调成阿里云镜像。
<repositories>
    <repository>
        <id>alimaven</id>
        <name>aliyun maven</name>
        <url>http://maven.aliyun.com/nexus/content/groups/public/</url>
    </repository>
</repositories>
1
2
3
4
5
6
7
2
3
4
5
6
7
# 第3分钟:定义通信协议
这里提供的示例是一种简单的字符串通信协议,仅作效果演示。实际场景中还需根据通信双方约定的协议实现编解码算法。
import org.smartboot.socket.Protocol;
import org.smartboot.socket.transport.AioSession;

import java.nio.ByteBuffer;

public class StringProtocol implements Protocol<String> {

    @Override
    public String decode(ByteBuffer readBuffer, AioSession session) {
        int remaining = readBuffer.remaining();
        if (remaining < Integer.BYTES) {
            return null;
        }
        readBuffer.mark();
        int length = readBuffer.getInt();
        if (length > readBuffer.remaining()) {
            readBuffer.reset();
            return null;
        }
        byte[] b = new byte[length];
        readBuffer.get(b);
        readBuffer.mark();
        return new String(b);
    }
}
1
2
3
4
5
6
7
8
9
10
11
12
13
14
15
16
17
18
19
20
21
22
23
24
25
2
3
4
5
6
7
8
9
10
11
12
13
14
15
16
17
18
19
20
21
22
23
24
25
# 第4分钟:启动服务端
服务端的通过System.out打印客户端传输过来的字符串内容,并将该内容原样传回至客户端。
import org.smartboot.socket.MessageProcessor;
import org.smartboot.socket.transport.AioQuickServer;
import org.smartboot.socket.transport.WriteBuffer;

import java.io.IOException;

public class StringServer {

    public static void main(String[] args) throws IOException {
        MessageProcessor<String> processor = (session, msg) -> {
            System.out.println("receive from client: " + msg);
            WriteBuffer outputStream = session.writeBuffer();
            try {
                byte[] bytes = msg.getBytes();
                outputStream.writeInt(bytes.length);
                outputStream.write(bytes);
            } catch (IOException e) {
                e.printStackTrace();
            }
        };

        AioQuickServer server = new AioQuickServer(8888, new StringProtocol(), processor);
        server.start();
    }
}
1
2
3
4
5
6
7
8
9
10
11
12
13
14
15
16
17
18
19
20
21
22
23
24
25
2
3
4
5
6
7
8
9
10
11
12
13
14
15
16
17
18
19
20
21
22
23
24
25
try-catch中先后调用writeInt、write是一种协议编码手法,也是从事通信开发必须要掌握的技能。
# 第5分钟:启动客户端
客户端与服务端建立TCP连接后,便向其发送hello smart-socket,当收到服务端的响应消息时,通过MessageProcessor的实现类进行控制台打印。
import org.smartboot.socket.MessageProcessor;
import org.smartboot.socket.transport.AioQuickClient;
import org.smartboot.socket.transport.AioSession;
import org.smartboot.socket.transport.WriteBuffer;

import java.io.IOException;

public class StringClient {

    public static void main(String[] args) throws IOException {
        MessageProcessor<String> processor = (session, msg) -> System.out.println("receive from server: " + msg);
        AioQuickClient client = new AioQuickClient("localhost", 8888, new StringProtocol(), processor);
        AioSession session = client.start();
        WriteBuffer writeBuffer = session.writeBuffer();
        byte[] data = "hello smart-socket".getBytes();
        writeBuffer.writeInt(data.length);
        writeBuffer.write(data);
        writeBuffer.flush();
    }
}
1
2
3
4
5
6
7
8
9
10
11
12
13
14
15
16
17
18
19
20
2
3
4
5
6
7
8
9
10
11
12
13
14
15
16
17
18
19
20
# 最后
恭喜你,现在你已经成功实现了一套通信服务。如果过程中遇到阻碍没能在 5 分钟内完成,不妨好好消化一下整个过程,再从头试一遍。
在实际的项目中,你可能需要考虑更加复杂的业务场景,比如:
- 如何处理异常?
- 如何处理超时?
- 如何处理粘包和拆包?
- 如何处理心跳?
- 如何处理断线重连?
- 如何处理消息队列?
- 如何处理并发?
- 如何处理线程安全?
- 如何处理性能优化?
如果你正遇到这方面的困难,可以考虑我们提供的 付费咨询服务。